
In this blog I want to focus on the basics of contouring, a sort of contouring 101.
Contouring is simple, and if done right it can change the whole appearance of your face. I have a round face with puffy cheeks and not much definition – not ideal!. But contouring allows me to have the cheekbones I’ve always dreamed of, Amen!
Everyone is different. Depending on your face shape there are different tips and tricks to give you your dream shape. But I’ll save that for another blog! For now, I’m going keep things simple.

For a simple contour you will need:
A beveled Brush
A Contour Kit or Bronzer of your choice (anything darker than your normal skin tone)
You want to start off by looking in the mirror and studying your face, what is it you want to achieve? For me, I want more defined cheekbones and for it to be slightly narrower.
I start by feeling my face to see where my cheekbones sit. You should then feel the hollowness underneath them, this is where you’re going to apply the darker bronzer. I’m going to use Benefit Hoola, it’s a beautiful colour, goes on so smoothly and gives a matte finish.
There are loads of different products that you can use to contour and you can also choose between cream or powder textures. Because I have combination skin and use powder on top of my foundation, I prefer to use a powder contour as it doesn’t clog.
Take your beveled brush and add a little bronzer, not too much as you don’t want to look like Morticia (or maybe you do…?). Under your cheekbones, where it feels hollow, shade in a line from your ear towards the corner of your mouth like so…

Repeat on the other side, blending the line in to give a more natural finish.
Next up is to add a little more definition on the nose. Taking a slightly smaller brush, use the bronzer and sweep down either side of the nose from the brow to the tip. Use your fingers to blend this in.

Finally, I blend in some bronzer on each side of my forehead, if your forehead is quite broad then shade at the sides. If your forehead is quite long then you want to shade along the top of the hairline. I also shade along the jawline just to soften it up. On my course it says that you should always try to create an “inverted egg shape or oval” as this is the ideal.
Once it is all blended in and you are happy with it, add some highlighter where the light would usually catch your face (center of the forehead, down the middle of the nose, cheekbones, cupids bow and chin).
Ta-da! Your contouring is complete. I tend not to do so much of a dramatic contour on my face, simply because I’m not brave enough. But the subtle difference is enough for me!
Before After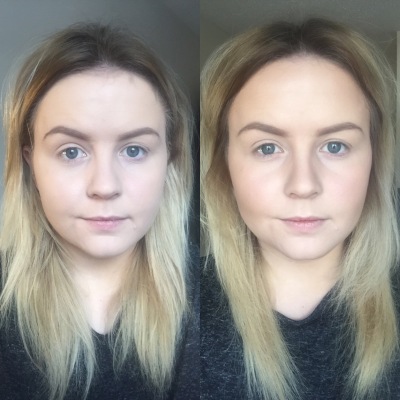
You can do so much more with contouring but remember this is just a basic 5-minute job.
In the future I’ll do a blog about the different contouring techniques for different face shapes.
Hope you enjoyed this post! How do you contour and whats your favourite product to use? Let me know in the comments below!
Love X

hey Club penguin i love playing clubpenguin xd but i loved that music and probuly its gonna be the best party of all and in the coins for chance do we pay for real ‘-’
LikeLike
That’s a brilliant answer to an insntetrieg question
LikeLike
Pingback: What’s to come… |
It’s so interesting to see the different ways people do something that is so popular. Just goes to show that makeup is supposed to be fun and you just do it the way it works for you. I’ve started using a cream contour stick and a beauty blender then setting with powder and it’s amazing how different it looks. You look amazing with and without contour just so you know! Xx
LikeLiked by 1 person
Ahh thank you! It is, there are so many different ways to do it, it’s just finding what works for you 🙂 which contour stick do you use? I’ve been dying to try one for ages but not sure which one to get xx
LikeLike
This is great! I never really understood contouring so this has been useful! You mention highlighting where the light would usually catch your face.. I’m not too sure about how to do this successfully .. What highlighting product did you use to complete the look?
Thanks xX
LikeLike
Hello 😊 I use benefit high beam or I’ve just bought Goddess of Love Triple Baked Highlighter (Makeup Revolution in Superdrug) I shall show you when I see you xx
LikeLike